| Vancouver Auto Chat 2016 VAC Community Head Moderator: Raid3n |
 |  04-16-2014, 01:21 AM
|
#1 | | Meow
Join Date: Dec 2010 Location: Burnaby
Posts: 1,286
Thanked 665 Times in 216 Posts
Failed 77 Times in 17 Posts
| Repairing poly urethane lip
| 
|  | |
04-16-2014, 01:30 AM
|
#2 | | is best wrench
Join Date: Jun 2006 Location: Vancouver
Posts: 2,485
Thanked 1,208 Times in 272 Posts
Failed 190 Times in 33 Posts
|
Use a heat gun to correct the shape. Are you planning to install this without painting it? Most of these polyurethane lips are beat up like this. Some sanding prep work before painting is recommended
| |
| | |
04-16-2014, 12:01 PM
|
#3 | | Meow
Join Date: Dec 2010 Location: Burnaby
Posts: 1,286
Thanked 665 Times in 216 Posts
Failed 77 Times in 17 Posts
|
Yea I wanted to do the install without paint, I mainly want it to protect my bumper from some scrapes.
Posted via RS Mobile | |
| | |
04-16-2014, 12:12 PM
|
#4 | | Zionism gets my shell hard and slimy
Join Date: Jun 2012 Location: in a shell
Posts: 2,597
Thanked 6,021 Times in 1,129 Posts
Failed 253 Times in 80 Posts
|
if you use a heat gun safely u can actually clean that lip up alot, of plastic lips get dull u can heat gun them and it makes them shiny again
pull out some sand paper and clean it up, then heat gun the area, i did it with my lip
__________________ Quote:
Originally Posted by smoothie.  It doesn't matter what size you are, if all you do is masturbate. | | |
| | |
04-16-2014, 09:30 PM
|
#5 | | 【=◈︿◈=】
Join Date: Aug 2006 Location: Ricemond
Posts: 4,939
Thanked 2,099 Times in 558 Posts
Failed 73 Times in 43 Posts
|
beauty with poly pieces is that a little heat goes a long way. rough it up with some sandpaper, heat it up then take a can of spraypaint to it - matte black does wonders and is hard to mess up
Posted via RS Mobile | |
| | |
04-16-2014, 09:34 PM
|
#6 | | Rs has made me the woman i am today!
Join Date: Sep 2006 Location: Vancouver
Posts: 4,170
Thanked 1,361 Times in 594 Posts
Failed 149 Times in 56 Posts
|
In the same shoe as OP. Going to sand down my front lip on the rough areas and spray paint it. I guess we got what we pay for  | |
| | |
04-16-2014, 09:42 PM
|
#7 | | Even when im right, revscene.net is still right!
Join Date: Dec 2011 Location: Burnaby, BC
Posts: 1,356
Thanked 1,532 Times in 479 Posts
Failed 202 Times in 77 Posts
|
Sand 'er down and spray it semi-gloss black.
| |
| | |
04-16-2014, 09:43 PM
|
#8 | | Rs has made me the woman i am today!
Join Date: Sep 2006 Location: Vancouver
Posts: 4,170
Thanked 1,361 Times in 594 Posts
Failed 149 Times in 56 Posts
|
What grit do you guys recommend sanding down with?
| |
| | |
04-16-2014, 10:04 PM
|
#9 | | Even when im right, revscene.net is still right!
Join Date: Dec 2011 Location: Burnaby, BC
Posts: 1,356
Thanked 1,532 Times in 479 Posts
Failed 202 Times in 77 Posts
| Quote:
Originally Posted by Euro7r What grit do you guys recommend sanding down with? | http://honda-tech.com/showthread.php?t=2902049 | |
| | |
04-16-2014, 10:49 PM
|
#10 | | I contribute to threads in the offtopic forum
Join Date: Oct 2009 Location: richmond
Posts: 2,836
Thanked 1,490 Times in 570 Posts
Failed 172 Times in 64 Posts
|
scotchbright pad not sand paper
__________________
Rise Auto Salon
11938 95a Ave Delta
I can be reached VIA text @ 778-232-1465
Oil change special $70 5 liters synthetic oil including OEM filter Fender rolling from $45 per fender
Car Audio:
Focal, Morel, Genesis, Clarion, Scosche, Escort, Compustar, GReddy, Blitz, Tomei, Motul, Endless, Defi, Cusco, Nismo + More
We specialize in:
Custom Car Audio
Race/4x4 Fabrication
Forced Induction
Engine Swaps
General Maintenance | |
| | |
04-17-2014, 09:50 AM
|
#11 | | WOAH! i think Vtec just kicked in!
Join Date: Feb 2010 Location: B.C
Posts: 1,659
Thanked 2,532 Times in 446 Posts
Failed 358 Times in 70 Posts
|
hey, at least its a small lip, and there was no previous paint on it..
my bumper was resprayed 2 times with no prep before it got to me.. and i had to sand the whole thing down...........
it was so bad, i could scrap off the paint with a blade and powerwasher for the tight areas. lol 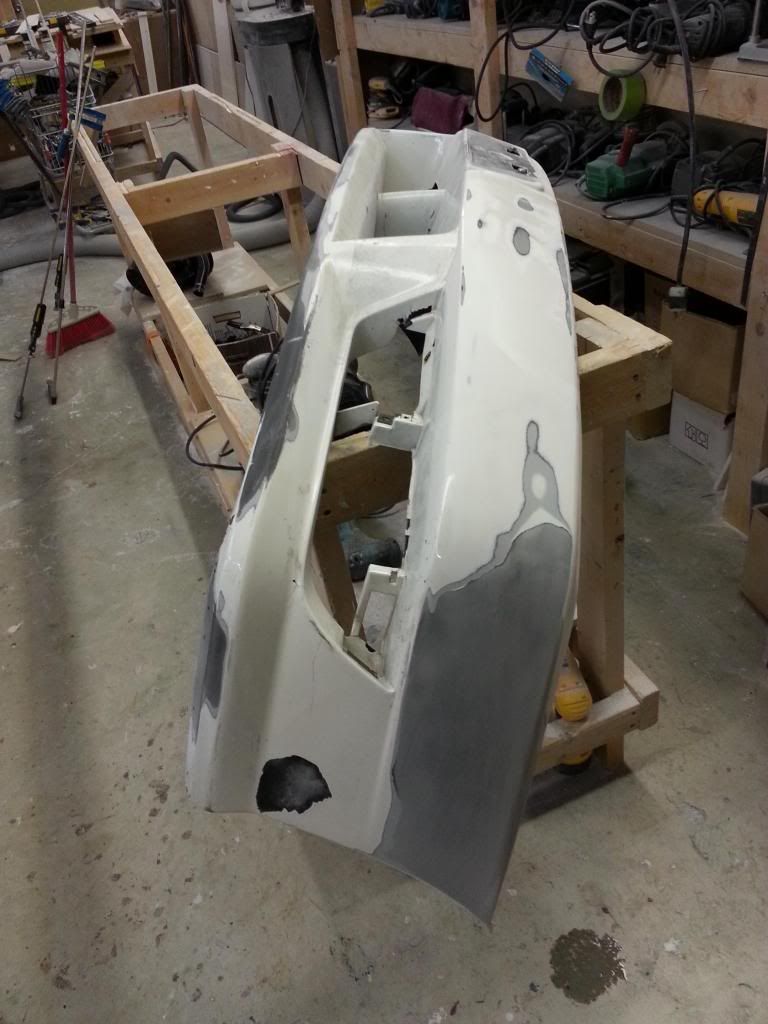
__________________
I <3 my S14 Quote:
Originally Posted by westopher "Not driving your car hard to keep it in nice shape for the next buyer is like not banging your girlfriend to keep her fresh for her next boyfriend" | | |
| | |
04-17-2014, 10:07 AM
|
#12 | | 【=◈︿◈=】
Join Date: Aug 2006 Location: Ricemond
Posts: 4,939
Thanked 2,099 Times in 558 Posts
Failed 73 Times in 43 Posts
| Quote:
Originally Posted by Euro7r What grit do you guys recommend sanding down with? | red scotchbright for the initial, wet sand with high grit (anywhere from 600-1000 depending on condition). its a little hard to tell from pics (at least on the phone) so hard to say exactly. but scuffing with scotchbright pads, priming, wet sanding, painting, wet sanding then clear is usually a pretty general + safe route. you can even skip all the wet sand steps, all depends on how much time/effort you want to put into it Posted via RS Mobile | |
| | |
 Posting Rules
| You may not post new threads You may not post replies You may not post attachments You may not edit your posts
HTML code is Off
| | |
All times are GMT -8. The time now is 04:27 AM.
|
 You are currently viewing our boards as a guest which gives you limited access to view most discussions and access our other features. By joining our free community you will have access to post topics, communicate privately with other members (PM), respond to polls, upload content and access many other special features. Registration is fast, simple and absolutely free so please, join our community today!
The banners on the left side and below do not show for registered users!
You are currently viewing our boards as a guest which gives you limited access to view most discussions and access our other features. By joining our free community you will have access to post topics, communicate privately with other members (PM), respond to polls, upload content and access many other special features. Registration is fast, simple and absolutely free so please, join our community today!
The banners on the left side and below do not show for registered users!


